
FOTW: April 30, 2008
Labels:
Almay Nearly Naked Liquid Makeup,
CoverBlend,
FOTW,
Makeup,
Monistat Chafing Relief Gel,
Neutrogena,
UDPP

I decided to go with a fairly tame 'Face Of The Week' for my first one. It's not too exciting, but I wanted to get my face out there so that everyone knows who is behind all this Shop With a Vengeance mayhem :)
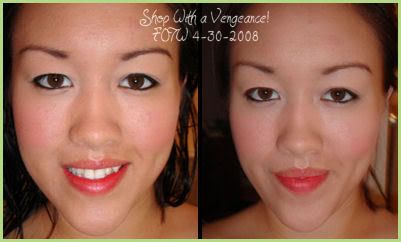
What I used:
Comments:
- Primer - Face: Monistat Chafing Relief Gel, Eye: UDPP
- Foundation - Almay Nearly Naked Liquid Makeup in Honey, CoverBlend Concealer in Beige and Light, Sonia Kashuk Loose Powder
- Cheeks - Jane Blushing Cheeks in Blushing Plum
- Brow - The Body Shop Brow/Liner Powder Duo, Revlon Brow Fantasy Gel
- Eye - MAC Fluidline in Blacktrack, MAC Powerpoint Pencil in Engraved, Neutrogena Healthy Volume Mascara (see it doesn't do much for my short lashes, does it?)
- Lips - Homemade Lip Stain!
Comments:
The photos are unretouched, just cropped up. I have been having a bad skin week, so ignore the rough/blemishy condition of mine right now; I had a pretty bad breakout due to Shiseido SPF42 PA+++ Foundation (Fragrance and too heavy, no no) and possibly also Origins Clean Energy Cleansing Oil (too many botanical extracts for my skin to handle!). I have been trying to nurture my skin back to health and bought a bunch of stuff to do so last night... so I'll be back in business in no time!
I did this look on Tuesday so that I could actively comment on it and let you all know how it turned out. I don't usually use Almay's foundation, but I had some laying around so I figured I'd use it. (Now I remember why I stopped using it... it made me very oily, very quickly, and the rest of my makeup seemed to slide off within a few hours!) I am always on a foundation hunt that will probably continue forever. The one thing that seems to always work for me (that I've repurchased countless times) is Milani's Mineral Compact, so I'll likely be back to that right away.
I like the lip stain a lot, and not just because I made it! I think the end result color is pretty and natural, but still very rosy. I wouldn't wear it every day, but I would definitely make it a staple for at least once a week.
I did this look on Tuesday so that I could actively comment on it and let you all know how it turned out. I don't usually use Almay's foundation, but I had some laying around so I figured I'd use it. (Now I remember why I stopped using it... it made me very oily, very quickly, and the rest of my makeup seemed to slide off within a few hours!) I am always on a foundation hunt that will probably continue forever. The one thing that seems to always work for me (that I've repurchased countless times) is Milani's Mineral Compact, so I'll likely be back to that right away.
I like the lip stain a lot, and not just because I made it! I think the end result color is pretty and natural, but still very rosy. I wouldn't wear it every day, but I would definitely make it a staple for at least once a week.
This is my first FOTW, but hopefully there will be many more to come! What do you think?
Do It Yourself: Lip Balm Stain!
Labels:
Bargain Finds,
Do It Yourself,
Lip Balm,
Lip Stain,
Makeup,
Tutorials

 I had some free time so I decided to do a little tutorial on making your own lip balm stain. This, in essence, would be similar to Benetint Lip balm, but a lot easier on the wallet! You can use whatever balm you have available, from Chapstick to Chicken Poop, anything will do. Also, a fun "green" alternative would be to use Burt's Bees Lip Balm and Organic Food Dye. Not only is this balm useful for lip stain purposes, but it is also great for moisturizing since you are using a balm you already love. Have fun experimenting with colors and mixtures... this is fairly easy, but you might make a bit of a mess in the kitchen if you aren't careful!
Things you'll need:
- Microwave safe container with a spout, like a measuring cup
- Plastic disposable cup for mixing
- Toothpicks or other flat tool for mixing, I used a metal chopstick
- Wilton Gel Icing Color or other Food Coloring (Red, or other colors if you'd like to mix)
- Stick of Lip Balm, I used Badger Cocoa Butter Lip Balm in "Sweet Orange"
- Microwave! Mine is 1200Watts, so timing may vary
- Optional: Empty Lip Balm Pot Container


First, start off by twisting the tube of lip balm all the way up and removing the balm from the tube. If your balm is very soft, like Blistex Complete Moisture, you might want to consider putting the mixture, when complete, into the optional pot container since it might not stay intact otherwise. But, that's up to you to decide later. For now, place the balm you just emptied into the microwave safe bowl/cup and microwave on high for 15 second intervals, until your balm has melted completely. This time will vary, mine took about 50 seconds, so be sure to keep an eye on the balm!


Then, you wanna add your color. I used pure red, so I didn't have to worry about mixing colors, but you could add a little blue to make a berry stain that would be gorgeous as well! Just be sure to take a nice hefty amount. Remember: you want this to stain your lips, not just color them temporarily. Keep the amount in proportion to the amount of balm you have though... I had a decent amount of balm so I added about 1/4tsp. If you want a really dark stain, add more. If you want a light stain, add less... you know the drill.
Now, this is important, when you add the color if you are using a gel food dye like I used, pop that baby back into the microwave for an additional 10-15 seconds. This is important because the gel is harder to blend into the balm than liquid so you want to make sure it really melds into it. Remove from the microwave immediately and start stirring like you would with a whisk. Whip it up! While the balm is in liquid form, it will NOT blend directly with the food dye. Keep mixing as if you are trying to blend salad dressing.
You will notice the balm starting to harden up; this is your cue to pour the mixture into your original tube! Make sure you've twisted the tube back "down" so that it can be filled up! Pour away. If your mixture has hardened too much to pour, like mine did, then scoop it in. It doesn't have to be perfect! If you want a more streamlined final result, put it in the optional pot container or melt it down in the microwave if your original tube can handle it. Be careful while microwaving these products and be mindful. No metal or foil in the microwave, please! It might be kind of sloppy otherwise, so if you're nit-picky, feel free to smooth it over by slicing off the top or patting it down instead. I didn't bother.
Let the mixture set for about 15 minutes, then enjoy. Apply with a lip brush or q-tip, as this is sure to stain your fingers. Make sure you exfoliate your lips (warm washcloth, toothbrush and Vaseline -- pick your poison) prior to applying, as this will stick to and color any dry areas first! It will look like a matte lipstick on and then as it wears off you should be able to see how it has stained your lips nicely. The longer you let it sit, the more stained your lips will become. I took a quick pic for posting purposes:
Now, this is important, when you add the color if you are using a gel food dye like I used, pop that baby back into the microwave for an additional 10-15 seconds. This is important because the gel is harder to blend into the balm than liquid so you want to make sure it really melds into it. Remove from the microwave immediately and start stirring like you would with a whisk. Whip it up! While the balm is in liquid form, it will NOT blend directly with the food dye. Keep mixing as if you are trying to blend salad dressing.
You will notice the balm starting to harden up; this is your cue to pour the mixture into your original tube! Make sure you've twisted the tube back "down" so that it can be filled up! Pour away. If your mixture has hardened too much to pour, like mine did, then scoop it in. It doesn't have to be perfect! If you want a more streamlined final result, put it in the optional pot container or melt it down in the microwave if your original tube can handle it. Be careful while microwaving these products and be mindful. No metal or foil in the microwave, please! It might be kind of sloppy otherwise, so if you're nit-picky, feel free to smooth it over by slicing off the top or patting it down instead. I didn't bother.
Let the mixture set for about 15 minutes, then enjoy. Apply with a lip brush or q-tip, as this is sure to stain your fingers. Make sure you exfoliate your lips (warm washcloth, toothbrush and Vaseline -- pick your poison) prior to applying, as this will stick to and color any dry areas first! It will look like a matte lipstick on and then as it wears off you should be able to see how it has stained your lips nicely. The longer you let it sit, the more stained your lips will become. I took a quick pic for posting purposes:

Hope you love it, and here's to a beautiful Tuesday!
Any questions or additional ideas, let me know!
Make It Or Break It: Whale Tail vs. Muffin Top!
Labels:
Fashion,
Make It Or Break It,
Muffin Top,
Poll,
Style,
Whale Tail

I have decided to throw a little order into my blog here. I want to incorporate three official "days" onto the blog so that readers can know what to expect. The topics I'd like to include are: "Make it or Break it Monday", "FOTW Wednesday" and "Fashion Match Friday" :)
The first category will be an interactive poll for everyone to participate in that compares beauty, fashion, and style related things. I just figured this could be a fun way to start off the week. FOTW (Face of the Week) Wednesday is pretty self explanatory... as I realize I have never posted a FOTD and people are probably wondering when one is coming! This way I'm obligated to do one a week. And, Fashion Match Friday will give me a good opportunity to put up a weekly match. I love doing the Fashion Matches so that will keep me busy as well.
So, without further ado, here is the first Make it or Break it Monday post!
This week's poll is: What is worse, the "Whale Tail" or "Muffin Top"?
Vote, Vote, Vote!
Voted? Ok, good. Now feast your eyes on this beauty:
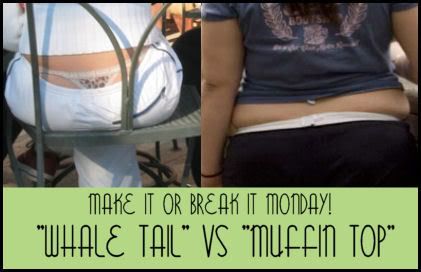

Sigh. Now, I am a heavier girl. Well, people tend to disagree with me on that, but I feel like I'm a heavier girl, and I know what looks good on me and what doesn't. I'm not going to into a rant about how heavier girls should not be wearing low rise pants because I believe everyone is entitled to wear what they feel comfortable in, but just make sure it fits you! A muffin top means, "Hey! guess what, your pants are too tight around the top!" and you should really buy the next size up. I am bigger around the middle and I have slim legs, and this advice really comes close to my heart: Don't be afraid of buying the right size. Who cares what the numbers say, what's important is that your pants fit, look good, and that you are comfortable. Cut the tags out if you have that much of an issue with size!
As for the whale tail, I have nothing to say. Don't hike up your thong if you are wearing extra low rise pants. Don't bend down if you are wearing extra low rise pants. Don't wear extra low rise pants! If you must, try layering a camisole under your shirt and tuck it in to your jeans. Better to show a cami bending down than your underwear! If you are self conscious about muffin tops and whale tails and your middle, try out something like the Tummy Tuck Jeans (hint: Giveaway!) that will prevent BOTH!
Some other stylish alternatives:
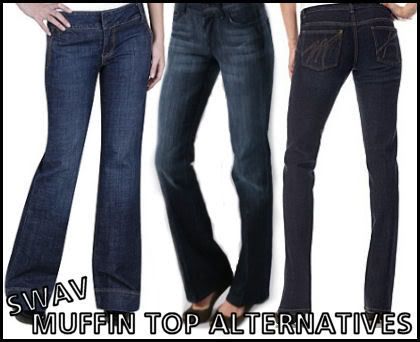
Forever 21 Lindy Trouser Jean $29.80
Seven Jeans High Waist Boot Cut $165.00
MK Signature Stretch Jean $99.50
I know this post was extra long, so thanks go out to those of you who stuck with it! Hope you enjoyed Make it or Break it Monday and I hope you have a fantastic week!
Not Your Daughter's Jeans - Tummy Tuck Jean Giveaway! (4/27/08 - 5/18/08)
Labels:
Fashion,
Giveaway,
Giveaways,
KMR Communications,
Not Your Daughter's Jeans,
Style,
Tummy Tuck Jeans

I'm happy to bring you another giveaway, courtesy of Not Your Daughter's Jeans and KMR Communications! This time, we'll be giving one lucky reader a pair of "Tummy Tuck Jeans" in their size!


Let me just say, these tummy tuck jeans are amazing! In honor of slimming down for summer, they are perfect to make you look and feel your best. The jeans flatten your tummy, lift your butt and make you look and feel one size smaller. I've tried them on myself at Lord & Taylor and they are made from super soft denim that feels great on. They are mid-high rise so you don't have to worry about showing too much when bending down! There are also new spring colors, shown in the chart above. Very flattering!
All you have to do to enter is comment on this post with your email address. That's all! All entries must be received by 5/18/2008. On 5/19/2008, I will be choosing a winner at random. Expect an email where you can provide me with your size and address, and Katherine of KMR will then take that information to send you out a pair of your very own Tummy Tuck Jeans! If the chosen winner does not respond by email within 7 days, I will be choosing another winner. You must provide your email address in order to win (otherwise I can't contact you!).
All you have to do to enter is comment on this post with your email address. That's all! All entries must be received by 5/18/2008. On 5/19/2008, I will be choosing a winner at random. Expect an email where you can provide me with your size and address, and Katherine of KMR will then take that information to send you out a pair of your very own Tummy Tuck Jeans! If the chosen winner does not respond by email within 7 days, I will be choosing another winner. You must provide your email address in order to win (otherwise I can't contact you!).
Good luck!
THIS CONTEST IS CLOSED! Check back for more great giveaways soon :)
Reader Feedback: Skincare Tips!
Labels:
Giveaway,
Giveaways,
Reader Feedback,
Skincare,
Sothy's

Congratulations go out to Katy Morris, winner of the Sothy's Skincare Giveaway as per Random.org! As part of the giveaway, I asked my readers to tell me what they do to keep their skin looking it's best.
Here are the results:
"My beauty tip is use a microfiber cloth to exfoliate instead those scrubbers with coarse material. Another one which I think is more important than what you do externally is watch what you eat. Make sure you eat your fruits and vegetables and foods high in omega-3 fatty acids." - Ngoc H.
"I drink plenty of water and see my dermatologist regularly." - Claudia
"In order to keep my skin looking its best, before I put on my favorite moisturizer at night, I make sure that I exfoliate not with a hand towel, but with an electronic toothbrush. The rubbing motion of the bristles is just the right motion to remove all the dead skin cells that are still on my face. I just use whatever exfoliant I am using at the time. Right now I'm loving Dr. Haschuka's Cleaning Cream." -Rebecca
"Right now my favorite skin care tip is an old fashioned one...but something I had forgotten: after cleansing your face use super-cold water after rinsing to tighten pores!" - Katy Morris
"I always touch my face gently and insist that others do the same!" - Paula in Seattle
"My favorite skincare tip would be to "relax, relate, and release". I know it's a cheesy line, but I believe that hormones play a key role in how our body reacts to various stress levels. And since our skin is our largest organ, it is ultimately affected by our moods and lifestyle changes. I generally can't go wrong with a basic skincare routine (cleanser, toner, moisturizer), however, i've noticed that my skin was its clearest when I made an effort to relax more and not let stressful experiences overwhelm me." - Kenya (Virtuous Blue)
"Mine would be to use a moisturizer with SPF 15 or higher. Also, what the other ladies said drink plenty of water." - Karina"My biggest skincare tip would be a tip passed on by my mom. It would be sleeping early and having at least 8 hours of sleep everyday. Trust me, it needs some discipline to sleep early every night! When you have enough sleep, you will feel fresh, your skin doest feel dehydrated and your eyes look bright and well rested. You will also realise that with enough sleep, your makeup glides on beautifully on your skin. I've also noticed I do not need as much makeup compared to days when I'm sleep deprived. Skin rejuvenates and heals as we sleep, usually between 12midnight - 3am. Therefore, this also helps to maximize the potential of our night cream treatment. " - Beauty Tyrant
Subscribe to:
Posts (Atom)

 Posts
Posts

